Granulator III is a completely new instrument in my Granulator series, developed by me and some passionate people at Ableton. It comes with many exciting features, such as full support for MPE, an extensive modulation matrix, a streamlined UI, a powerful revised capture feature, which enables you to record any sound source directly into the instrument, without the need of using another device, a monophonic mode, and an abundance of other carefully crafted details. This page is under development, and will soon have more content, such as sound examples, presets, tutorial videos, and more. Please come back later to discover more! Granulator III needs Ableton Live 12 Suite to run and can be downloaded from Ableton.com. You need to be logged in to your user account to access the download link.
The older Granulator II instrument is still available, but it may not be updated anymore in the future.
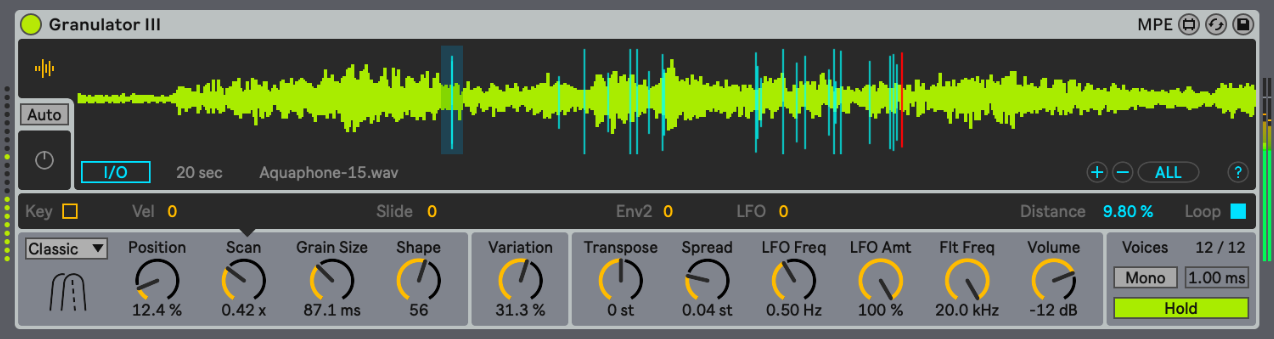
The user interface of Granulator III consists of three areas: The Main Display, the Modulator Display, and the Parameter Display. The Main Display either shows the loaded sample including a visualisation of grain start position, current playback position, and grain size as well as the controls for the Capture feature. Or it shows the two Envelopes, the LFO and the Filter.
The view can either be switched manually by clicking on the top and bottom Display Selector buttons on the left or set to automatic switching ('Auto'). In that mode, clicking on a parameter left of 'Variation' switches to Sample Display, and clicking on a parameter right of it switches to the Envelope Display. Below the Main Display is the Modulator Display, which shows the modulations for each of the main parameters. A little triangle indicates for which main parameter the modulations are shown.
Note that not all parameters offer the same set of modulations. This makes the synthesis engine more effective and allows to fine-tune the behaviour of each modulation.
For the sake of simplicity, the waveform display only shows the left channel if a stereo sample is used.
You can zoom into the waveform, centred around Position, with the (+) button at the right bottom of the Sample Display, you can zoom out again via (-) or go back to the full sample view using (ALL).

The sample used by Granulator III can either be dragged from the Browser or from Session or Arranger onto the instrument. Note this also works when the Main Display is set to Envelope Display. If the Display Selector on the left side is set to Auto or to Sample Display, the new sample is immediately visible. If Display Selector is set to Envelope Display a sample can still be dropped but there will be no visual feedback.
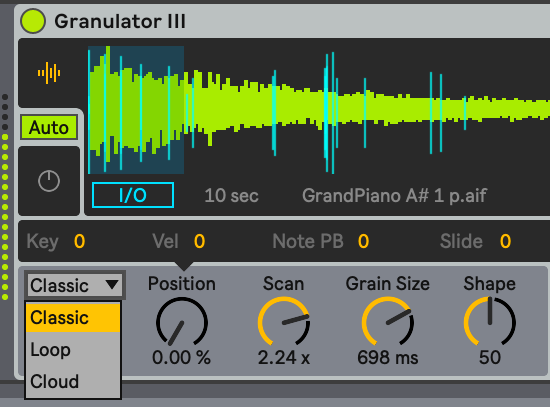
Granulator III offers three different grain playback modes. Classic is based on Granulator II, and provides the most versatile and expressive engine. It creates two overlapping grains per stereo channel, with a very flexible grain envelope. Loop is much closer to a 'normal' sampler with crossfading sample playback and random position modulation, providing the ability to play longer sections unaltered, and Cloud offers layers of up to 20 non-synced individual grains, especially interesting for creating thick monophonic textures.
The Position parameter defines which section of the source sample is played back in each grain. Since it is scaled in % it stays at its relative position even when a new sample is loaded or captured. Position can be modified in various ways, it can move from its start point to an endpoint, see the Scan parameter for details, it can have a random variation for each grain using the Variations parameter and it can be controlled via the LFO, Envelope 2, and several MIDI signals, including note pitch ('Key'), note velocity ('Vel') and all three MPE parameters.
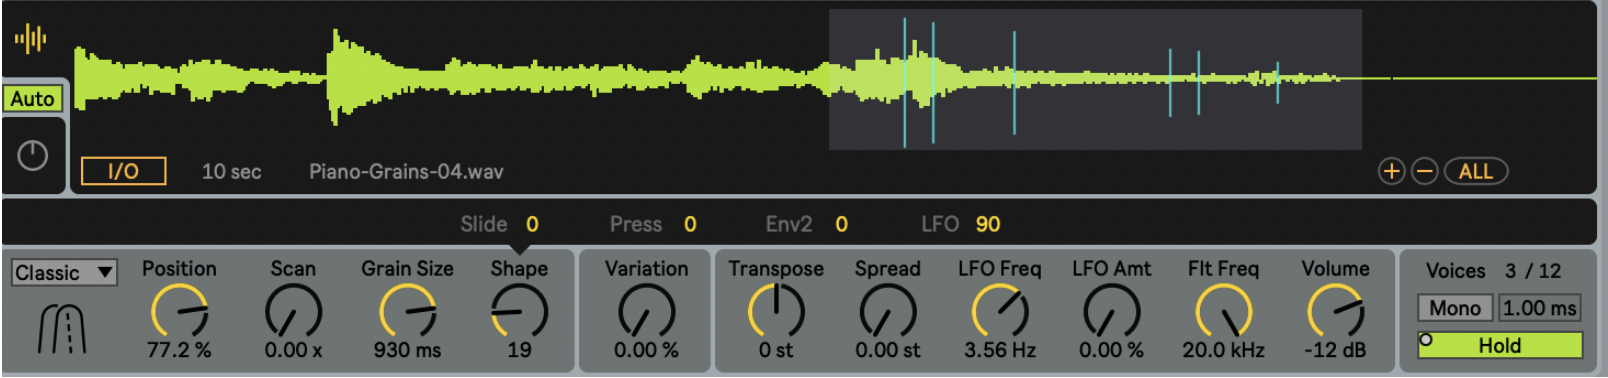
The Position parameter can be set by turning the Position knob or by clicking directly at the desired part of the sample in the Waveform Display.

When clicking on the Position (or any other main parameter), the Modulator Display automatically shows the modulations for this parameter. In the screenshot above, Position is modulated by the LFO and by Variation.
The Scan function provides a useful and versatile modulation source of grain position: A ramp that starts when a new note is triggered. The ramp can either stop at a defined end position (Loop is off) or it can restart (Loop is on). The end position is defined as a relative Distance to the main Position.
If the addition of Position and current Scan value exceeds 100% and hence the end of the sample is reached, the play position folds back to the beginning. This can be particularly useful when working with rhythmical loops as source material. The Scan speed can be a function of Key, Velocity, and MPE Slide. It can also be modulated with Envelope 2 and the LFO. In conjunction with Transpose and Grain Size, a great variety of time stretch and pitch shifting sample playback variants can be achieved, as well as most complex time warps.

If Key is enabled, the speed of the scanning follows note pitch, which provides a constant scanning ratio for each played note, whilst if it is turned off, the speed stays constant regardless of note pitch. Playing multiple notes at once and switching between the two options makes the difference very obvious.
The core of Granulator III is a grain playback engine, and its most prominent parameter is the size of each grain. A grain can be as small as 2 milliseconds, which implies that 1000 or more overlapping grains are created per second, resulting in noisy or high-pitched tonal timbres. It can also be as long as 2 seconds, which means long parts of the source file are read out before a new grain starts.

Grain Size can be affected by Key, Velocity, and MPE Slide and Press. It can be modulated with the LFO and the Envelope 2. For typical 'stochastic' granular effects, the size of each grain can also be modulated with a random value, controlled via the Variation modulation parameter, for details see below. In the Loop grain mode, a Reverse parameter defines a chance that a grain is played backwards. A value of 100% implies all grains will play backwards. In the Clouds grain mode, the number of grains playing at the same time can be defined by the Density parameter, allowing up to 20 grains per stereo channel per note. When Grain Size is modulated, it does not change immediately but attempts to finish the grain first to avoid clicks. The exact behaviour here depends on the Grain Mode.
The Shape or envelope around each grain has a distinct impact on the sound and behaviour of Granulator III. Shape can be controlled by the MPE parameters Slide and Press, and by LFO and the Envelope 2. Depending on Grain Mode, the grain shape itself and the shape parameter have different properties:
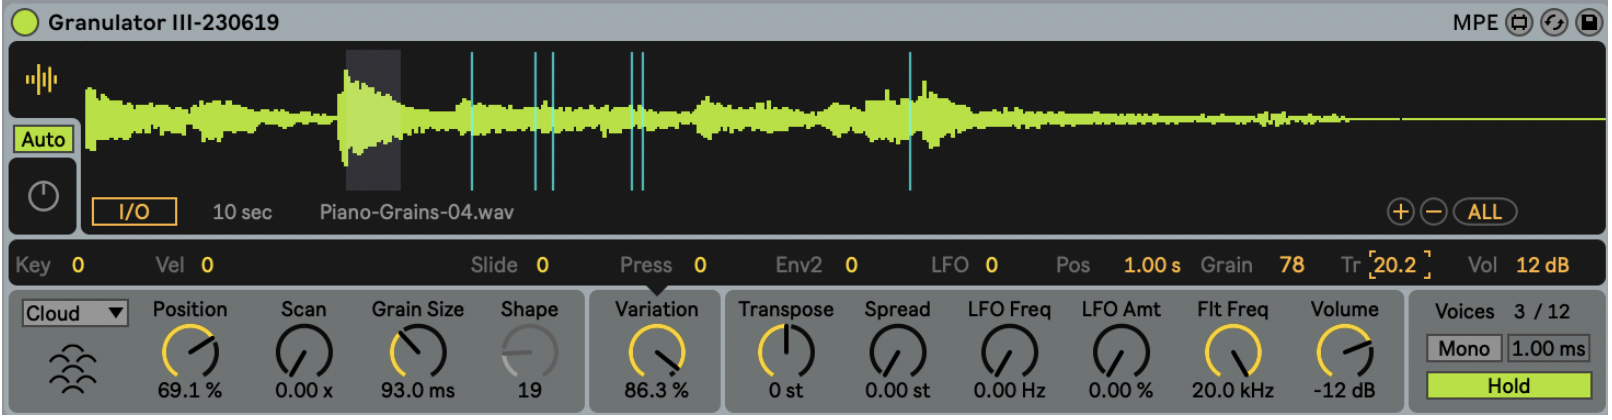
In Classic mode, the shape can morph from grains with a sharp attack and exponential decay to smooth crossfading to exponential attack and abrupt end, see screenshot above. In Loop mode, the grain shape defines the length of a crossfade at the beginning and end of a grain. A grain shape of zero equals a looping playback with no crossfade at all, whilst 100% means there is always a fade going on. In Clouds mode grain shape cannot be adjusted for CPU efficiency reasons.
Since the effect of the Grain Shape is calculated at the beginning of each new grain, with longer grains and fast regular modulations e.g. via the LFO, quite complex rhythmical textures can be obtained, depending on the source material. The real-time grain playback visualisation (cyan-coloured moving lines) shows the effect of the grain shape, in the screenshot above it is clearly visible that the grains have a short attack and fades out towards the end.
A lot of interesting things can happen when the start position of each individual grain, its size, amplitude, or pitch is modulated with a random value. Static looping timbres can become more alive, things can become very noisy (when working with very small grain sizes), or rhythmical loops can dissolve into lovely granular madness.
The overall randomness can be controlled via the Variation amount parameter, and the individual effects on the grains can be adjusted with the Position, Grain Size, Transpose, and Volume modulation parameters. The random variation of grain pitch via Transpose is currently only possible in Cloud mode, and negative values do not have an effect. This might change in a future update.
Variation of grain position is absolute, with a range between zero and two seconds, independently of source sample length. Position variation is always positive, whilst the other variations are bipolar.
The Variation amount parameter can be modulated by the MPE parameters Slide and Press, by the LFO, Envelope 2, Key, and by Velocity.
The overall tuning of the grain playback can be adjusted in this section, including a fine-tuning parameter, Tune. Typically the grain tuning follows incoming MIDI notes, with Key set to 100%, but it is also possible to scale this differently. There is a lot to discover especially in conjunction with Key modulation of Grain Size. The perceived pitch of a timbre especially for small grain sizes can become very hard to predict and experimentation with Key modulations is highly encouraged here! It is possible to control overall pitch per Note Pitch Bend, MPE Press, Envelope 2, LFO, and via a random value at note start. For convenience, the pitch Variation parameter is also present in the Transpose Modulator Display. As stated above, grain variation of pitch is only available in Cloud mode at the moment.
Unlike a normal synthesizer, where the tuning is defined by the frequencies of the oscillators, things are a bit more complex with samples and even more so in granular synthesis. If you play back a sample at note C3, convention says this is its original pitch: It plays back at the same rate as it has been recorded. If that sample contains a sound which has a musical pitch of C3, everything is easy, you hear a C3 when playing a C3 and all the correct other notes when playing them. If the material contains a C#3, you have to tune it down by one semitone to get the correct pitch. If a sample contains multiple musical pitches (e.g. a whole melody) it gets more complex and potentially more interesting, too.
In granular synthesis, short parts of the sample are played back very often, and depending on the source material this can easily lead to a perceived pitch that is a strange mix between the original sample source and the grain size. There is no simple way to predict those interactions, and the best thing one can do is experiment. The relevant parameters are everything in the Transpose and Grain Size sections. When working with small grains, try playing with the Key parameters of Transpose and Grain Size. When setting Transpose Key to zero, and Grain Size Key to 100, all notes play the same sample pitch but the grain size is scaled, potentially also creating a strong perception of pitch. Try this with a grain size of exactly 3.822ms to be in tune.
When you intend to work with Granulator with tuned material, and you want that MPE pitch bend data is received and that Granulator responds correctly to the Live 12 tuning systems, make sure that Note Pitch Bend in the Transpose section is set to 48st.

Spread allows detuning the left and right grain playback. This not only alters the pitch and can create a nice stereo chorus, but it also affects the actual starting times of new grains; once a new note has a bit of spread, the left and right channel grains are 'out of sync' and all Variations have different momentary values. As a result, even with a tiny amount of Spread, things are getting very 'stereophonic'. High values of Spread create dramatically different pitches for the left and right channel. Spread can be controlled via Velocity, MPE Slide, MPE Pressure, Envelope 2, and the LFO.
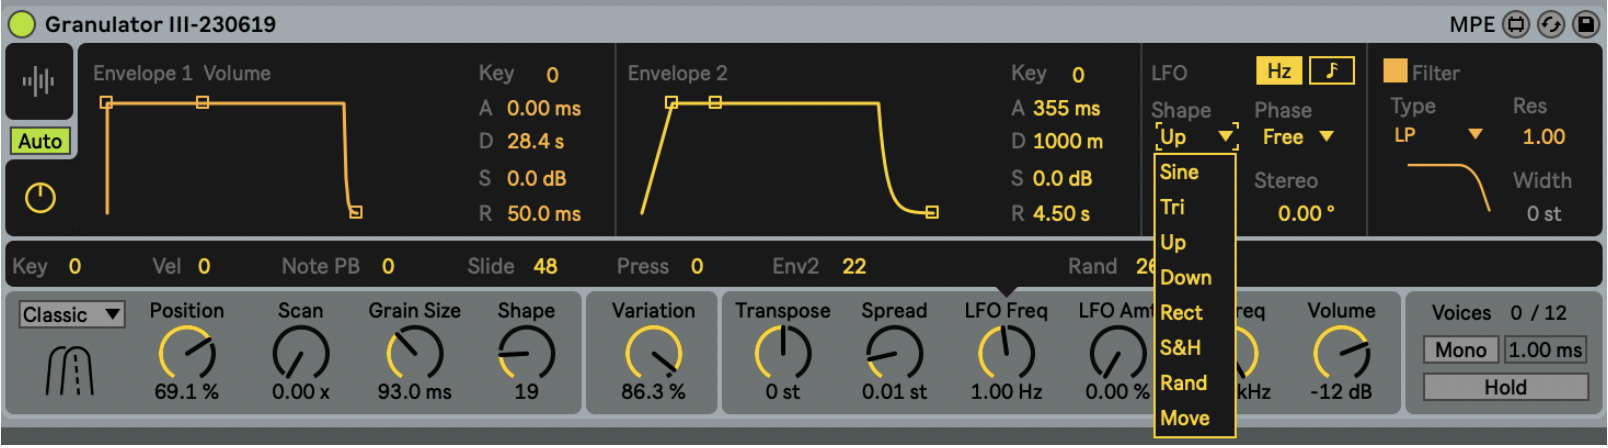
Granulator III comes with a versatile stereo LFO. It can run either in sync with the current beat time with a range from 1/16th note to 2 bars or as a free-running LFO with a range between 0.01Hz - 20Hz.
The LFO offers several shapes: Sine, Triangle, Up, Down, Rect, Sample & Hold (stepped random), and two flavours of continuous random variation (Rand, Move). The LFO can start at a defined Phase when a note is played, or it can start at a random phase instead. LFO shapes can be selected either via the Shape pulldown menu or by clicking on the LFO shape icon, which allows to step through the LFO shapes.
The Stereo control allows to adjust the stereo phase from mono (0°) to completely out of phase (90°) to inverted mono (180°). LFO Frequency can be modulated by the MPE parameters Note Pitch Bend and Slide, by Envelope 2 and Key, and by Velocity. LFO Frequency can also have a Random variation at note start. LFO Amount can be modulated by the Slide and Pressure, by Envelope 2 and by Key, and Velocity. When 'Use Mod Wheel' in the LFO Amount modulations section is enabled, LFO Amount is internally also scaled with incoming MIDI CC message #2 ('ModWheel').
The output of the LFO core can be quantised using the Quant modulation parameter. Depending on the LFO wave, this allows to create interesting stepped modulations. The quantisation is applied before the amount control.
Most LFO shapes are bipolar, meaning they have a range from -1 to +1 internally, but the two ramps (Up, Down) are starting / landing at zero, with a range from 0 to 1. This also affects the result of the quantisation. A quantisation value of 0.5 creates three values when the shape is Ramp: 0, 0.5, and 1, but five different values when using the Sine wave: 0, 0.5, 1, 0.5, 0, -0.5, -1.
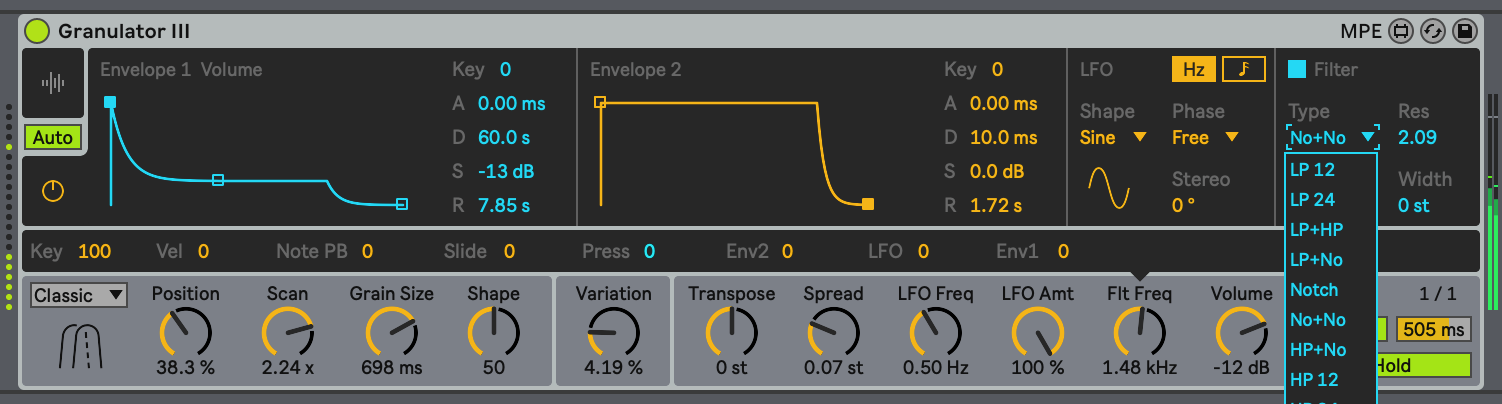
Two SVF filters in series provide 9 complex filter modes. The filter section can be turned off when not needed to save CPU. The modes are 24dB lowpass, 12dB lowpass, 12dB lowpass into 12dB high pass, 12dB lowpass followed by a notch filter, a single notch filter, two notches, a 12dB high pass followed by a notch, a 12dB high pass, and a 24dB high pass. Note that clicking on the Filter type icon allows to step through the filter types.
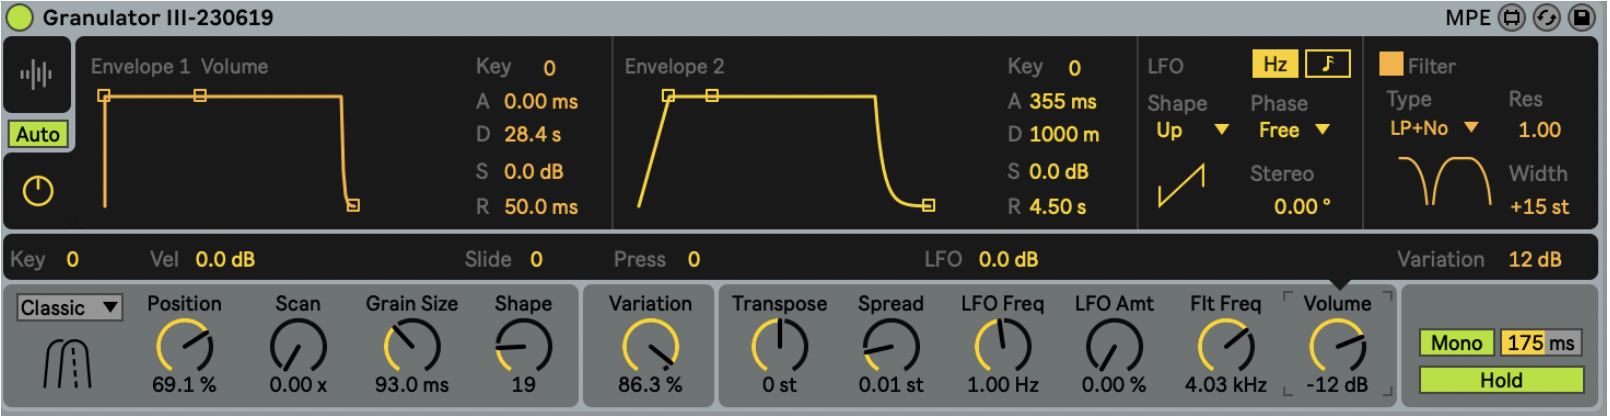
In all filters other than 12dB LP, 12dB Notch, and 12dB HP, the Width control defines the offset of the center frequency of the second filter.
Typically negative values make sense here, tuning the second filter's frequency lower. Think of the LP+Notch combination, where the notch is the second filter, and it only can contribute if its active frequency is below the cutoff of the lowpass.
The Resonance parameter controls only the main filter in two filter modes, the secondary one has a fixed setting. Filter Frequency can be modulated by all three MPE parameters, by the main Volume Envelope and Envelope 2, by Key, Velocity, and by the LFO.
A typical use case for filters in a sample-based instrument like this one is to remove or enhance specific harmonics that are part of the source material. When transposing the sample, those harmonics will follow. The filter in Granulator III has a default mapping to Key of 100% for this reason, it follows the spectrum of the sample when transposed.
The overall output volume can be adjusted in this section. Volume can be modulated via Key, by Velocity, by MPE Slide and Press, and by the LFO. The Variation parameter for per-grain amplitude modulation is also mirrored here for convenience.
When samples are dragged onto the sample view or when new samples are captured, they are normalised, which means their amplitude is internally scaled to match 0dB for the loudest part.
Volume modulation via LFO is broken in current version. Don't use. Update will come soon.
Granulator III offers two envelopes. Envelope 1 is directly modulating the amplitude, but can also affect Filter Frequency. Envelope 2 is a general modulation source that can affect a large number of parameters. Both envelopes feature extremely long attack, decay, and release times for slowly evolving timbres. They also have their own Key parameter, which allows to make the envelope rates a function of note pitch. This is useful when wanting higher notes to decay faster as is often the case in physical instruments.
Granulator III currently offers a fixed 8-voice polyphony and a dedicated monophonic mode. In monophonic mode, all modulations are affected by Glide, allowing for smooth morphing transitions between notes. Glide affects only overlapping notes, and glide time can be between zero and two seconds.
Granulator III has a unique Hold function, similar to those often found in arpeggiators. When active, the last played note(s) are held. This is very helpful for the effortless creation of steady textures or drones using a MIDI Keyboard: play some notes, and then fully focus on adjusting the parameters. Note that this function is different from how it works in Granulator II. In Granulator III when all keys are released, Hold will automatically clear held notes when a new note is played.
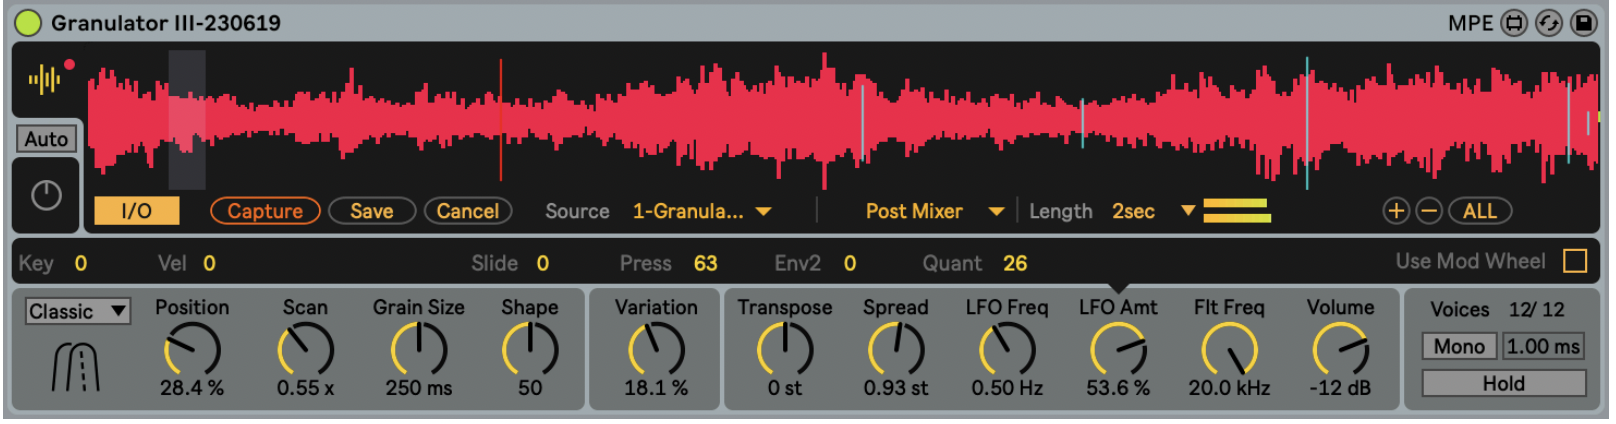
When Capture is enabled via the I/O control, an incoming audio signal selected by the two Source choosers can be used as an 'on the fly' sample. It is even possible to set the output from Granulator III as input for resampling.
Enabling I/O does not immediately replace the currently loaded sample, it just provides the interface for sampling.
Granulator III permanently records a few seconds of audio as defined by the capture Length chooser. When Capture is pressed, the currently loaded sample will be replaced by that recording, which is always a snapshot of the last few seconds. The parameter settings of Granulator III are unchanged.
To discard the recorded sample and go back to the previously loaded one, simply press Cancel. Note that Cancel will always bring you back to the last loaded sample, even when pressing Capture multiple times.
To keep the current recording, press Save. This opens a file dialogue in which a path for storing the sample needs to be defined. Granulator III will then attempt to save the recording in that folder and reload it as if it was another loaded sample.
If you do not Save a sample, it will be lost when re-opening your project and the last loaded sample will be used instead.
Granulator III project team @ Ableton:
Robert Henke (concept / implementation / UX)
Marco Tonni (UX / project management)
Eric Carl & Kostya Kazhev (user interface design)
Screenshots on this page made with my own Theme. You can grab it from here: roberthenke-live12-theme.zip